Introduction
In this introduction, we explore how to leverage the ESP8266 Wi-Fi module to send data to the ThingSpeak server. ThingSpeak is an IoT platform that allows you to collect, visualize, and analyze data in real-time. Using the ESP8266 module, which integrates seamlessly with Arduino and other microcontrollers, you can create IoT applications that transmit sensor data or other information to ThingSpeak over the internet.
ESP8266 Wi-Fi Module:
The ESP8266 is a versatile and cost-effective Wi-Fi module renowned for its capability to connect microcontrollers to Wi-Fi networks. It features built-in TCP/IP protocol stack, supports various Wi-Fi security protocols, and includes GPIO pins for interfacing with sensors and actuators.
Sending Data to ThingSpeak:
To send data to ThingSpeak using ESP8266, you typically follow these steps:
- Connect ESP8266 to Wi-Fi: Configure the ESP8266 to connect to your local Wi-Fi network using SSID and password credentials.
- Collect Sensor Data: Use sensors or other sources to collect data you want to send to ThingSpeak. This could include temperature, humidity, light intensity, etc.
- Prepare HTTP Request: Format the data into an HTTP GET or POST request compatible with ThingSpeak’s API. Include your ThingSpeak API key and the data values you wish to send.
- Send Data: Use the ESP8266 to make an HTTP request to the ThingSpeak server. This request includes the formatted data. Upon receiving the request, Thin
Benefits of Using ThingSpeak:
- Real-time Monitoring: ThingSpeak provides real-time data visualization and monitoring capabilities, allowing you to track changes and trends over time.
- Integration: It seamlessly integrates with various IoT devices and platforms, making it easy to build complex IoT applications.
- Analytics: ThingSpeak offers built-in analytics tools to analyze data, generate insights, and trigger alerts based on predefined conditions.
This provides an overview of the ESP8266 module’s role in IoT applications and outlines the steps involved in sending data to ThingSpeak, highlighting the platform’s capabilities in data visualization and analysis.
Hardware Requirements
Notice: There might be affiliate links to Amazon on this page. which implies that I may receive a tiny commission from the sale. This may be your way of indirectly assisting me. Regards- Arduino UNO (HERE)
- ESP8266-01 module (HERE)
- DHT11 sensor (HERE)
- 10K ohm resistor – 2nos
- Small breadboard (HERE)
- Connecting wires (HERE)
External Power Supply
- Transformer 9-0-9, 2amp – 1no
- 1N4007 bridge diode – 4nos
- 1000uF capacitor, 35v – 1no
- 7809 Voltage regulator – 1no
- 5mm RED LED – 1no
- 1K ohm resistor – 1no
Software Requirements
- Arduino IDE (Download HERE).
- DHT Library (Download HERE).
- Software Serial Library (Inbuilt within the IDE)
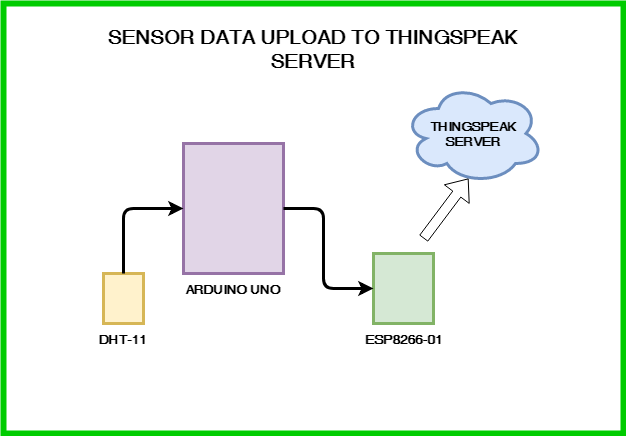
Block Diagram
By Following the below block diagram, we know the flow of data from ESP to cloud and then we can design our circuit. The block diagram typically outlines a configuration that involves basic components and straightforward connections, making it accessible even for beginners in IoT and electronics.
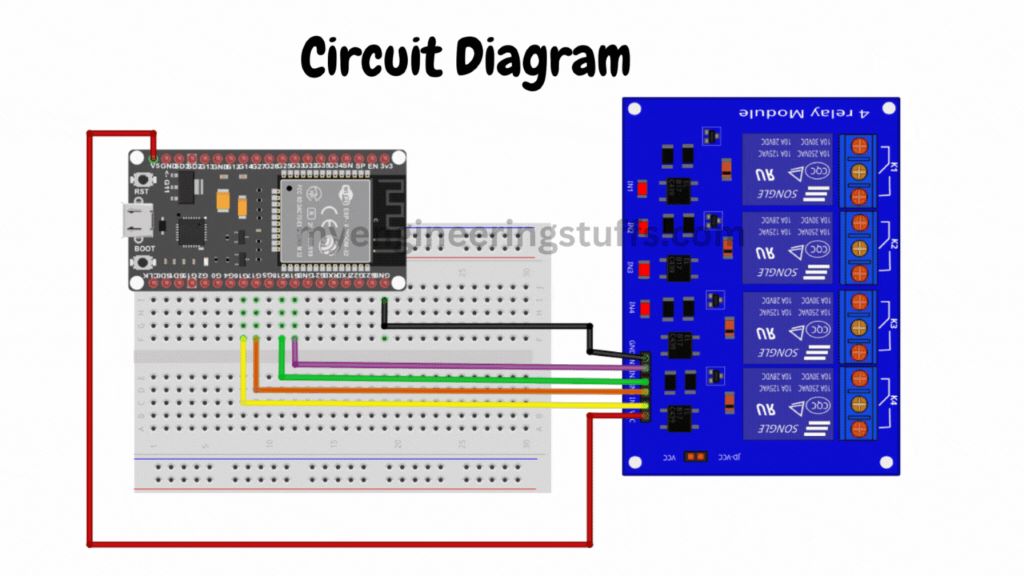
Circuit Diagram
Connection of ESP8266-01 with Arduino
Connecting the ESP8266-01 module with the Arduino UNO involves establishing communication for data exchange.
ESP8266-01 to Arduino UNO:
- PIN8 (TXD) of ESP8266-01 connects to PIN2 (Rx) of Arduino UNO (using SoftwareSerial Rx pin).
- PIN4 (RXD) of ESP8266-01 connects to PIN3 (Tx) of Arduino UNO (using SoftwareSerial Tx pin).
- PIN6 (RST) of ESP8266-01 is connected to 3.3V through a 10K ohm resistor to enable reset functionality.
- PIN7 (CH_PD) of ESP8266-01 is connected to 3.3V through a 10K ohm resistor to enable the chip.
- VCC of ESP8266-01 is connected to 3.3V power supply.
- GND of ESP8266-01 is connected to GND of the Arduino UNO for common ground.
ESP and Arduino UNO Connection Diagram
| ESP8266-01 | Arduino UNO |
| PIN8 (TXD) | PIN2 (Rx) Software serial Rx pin |
| PIN4 (RXD) | PIN3 (Tx) Software serial Tx pin |
| PIN6 (RST) | 3.3V through a 10K ohm resistor |
| PIN7 (CH_PD) | 3.3V through a 10K ohm resistor |
| VCC | 3.3V |
| GND | GND |
Connection of DHT11 with Arduino
The DHT11 sensor is a basic digital temperature and humidity sensor.
- DHT11 to Arduino UNO:
- PIN2 (OUT) of DHT11 connects to A0 analog input pin of Arduino UNO for reading sensor data.
- PIN1 (Vcc) of DHT11 connects to 5V power supply on the Arduino UNO.
- PIN3 of DHT11 is not connected (NC – No Connection).
- PIN4 (GND) of DHT11 connects to GND of the Arduino UNO for common ground.
| DHT11 | Arduino UNO |
| PIN2 (OUT) | A0 |
| PIN1 (Vcc) | 5v |
| PIN3 | NC |
| PIN4 (GND) | GND |
Circuit Explanation
ESP8266-01 Connection:
The ESP8266-01 module communicates with the Arduino UNO using SoftwareSerial library. Pins TXD (Transmit Data) and RXD (Receive Data) are connected to Arduino’s Rx (Receive) and Tx (Transmit) pins, respectively, allowing data exchange between the two modules. Pins RST and CH_PD are pulled up to 3.3V through resistors to ensure proper reset and enable signals for the ESP8266-01 module. VCC and GND connections provide power and ground for the module.
DHT11 Connection:
The DHT11 sensor’s OUT pin sends digital signals containing temperature and humidity data to Arduino’s analog pin A0. It operates on 5V power supplied by the Arduino UNO, with GND serving as the common ground. The NC pin of ESP01 (No Connection) remains unconnected as it is not used in this setup.
Now Arduino UNO to read temperature and humidity data from the DHT11 sensor and exchange data with the ESP8266-01 module for IoT applications, such as transmitting sensor data to online platforms like ThingSpeak or for remote monitoring and control.
This setup is fundamental for integrating sensors and wireless communication capabilities into Arduino-based projects, facilitating various IoT applications with ease and efficiency.
Create Account on ThingSpeak
👉 🌍 Follow the tutorial How to create and activate ThinkSpeak Account
Source Code
// Thingspeak
String myAPIkey = "OII2KGS7KGFTVLW5";

#include <SoftwareSerial.h>
#include <DHT.h>;
SoftwareSerial ESP8266(2, 3); // Rx,  Tx
/* DHT SENSOR SETUP */

#define DHTTYPE DHT11
#define DHTPIN  A0

DHT dht(DHTPIN, DHTTYPE,11);
float humidity, temp_f;
long writingTimer = 17;
long startTime = 0;
long waitTime = 0;


boolean relay1_st = false;
boolean relay2_st = false;
unsigned char check_connection=0;
unsigned char times_check=0;
boolean error;

void setup()
{
  Serial.begin(9600);
  ESP8266.begin(9600);
   dht.begin();
  startTime = millis();
  ESP8266.println("AT+RST");
  delay(2000);
  Serial.println("Connecting to Wifi");
   while(check_connection==0)
  {
    Serial.print(".");
  ESP8266.print("AT+CWJAP=\"TP-LINK_FDBA\",\"jaishrikrishna~12\"\r\n");
  ESP8266.setTimeout(5000);
 if(ESP8266.find("WIFI CONNECTED\r\n")==1)
 {
 Serial.println("WIFI CONNECTED");
 break;
 }
 times_check++;
 if(times_check>3)
 {
  times_check=0;
   Serial.println("Trying to Reconnect..");
  }
  }
}

void loop()
{
  waitTime = millis()-startTime;
  if (waitTime > (writingTimer*1000))
  {
    readSensors();
    writeThingSpeak();
    startTime = millis();
  }
}

void readSensors(void)
{
  temp_f = dht.readTemperature();
  humidity = dht.readHumidity();
}
void writeThingSpeak(void)
{
  startThingSpeakCmd();
  // preparacao da string GET
  String getStr = "GET /update?api_key=";
  getStr += myAPIkey;
  getStr +="&field1=";
  getStr += String(temp_f);
  getStr +="&field2=";
  getStr += String(humidity);
  getStr += "\r\n\r\n";
  GetThingspeakcmd(getStr);
}

void startThingSpeakCmd(void)
{
  ESP8266.flush();
  String cmd = "AT+CIPSTART=\"TCP\",\"";
  cmd += "184.106.153.149"; // api.thingspeak.com IP address
  cmd += "\",80";
  ESP8266.println(cmd);
  Serial.print("Start Commands: ");
  Serial.println(cmd);

  if(ESP8266.find("Error"))
  {
    Serial.println("AT+CIPSTART error");
    return;
  }
}

String GetThingspeakcmd(String getStr)
{
  String cmd = "AT+CIPSEND=";
  cmd += String(getStr.length());
  ESP8266.println(cmd);
  Serial.println(cmd);

  if(ESP8266.find(">"))
  {
    ESP8266.print(getStr);
    Serial.println(getStr);
    delay(500);
    String messageBody = "";
    while (ESP8266.available())
    {
      String line = ESP8266.readStringUntil('\n');
      if (line.length() == 1)
      {
        messageBody = ESP8266.readStringUntil('\n');
      }
    }
    Serial.print("MessageBody received: ");
    Serial.println(messageBody);
    return messageBody;
  }
  else
  {
    ESP8266.println("AT+CIPCLOSE");
    Serial.println("AT+CIPCLOSE");
  }
}
Pingback: How to Interface Thermal Printer with Arduino UNO - Projects4u
Pingback: How to Interface Membrane Matrix Keypad Using Arduino Uno with Example Project - Projects4u
Pingback: Home Automation Project Using Raspberry Pi Pico Bluetooth - Projects4u
Pingback: How to Create ThingSpeak Account for Displaying Sensor Data - Projects4u
Pingback: Smart Digital Notice Board with NodeMCU ESP8266 - Projects4u